Gear Review: Korkers River Ops Wading Boots

800 • 669 • 3474

Korkers River Ops Review – One Wading Boot for All Applications

Last week I had the opportunity to join a group of 12 anglers we booked for a week of fishing at the Alaska Steelhead Company located in Ninilchik, Alaska, on the Kenai Peninsula. It turned out to be a cold and challenging week of steelhead fishing, but we all landed some dime-bright fish and had a terrific time.

As you might know, since Jan. 1, 2012, footgear with absorbent felt or other fibrous material on the soles are prohibited while sportfishing in the fresh waters of Alaska. This law was initiated by the state to eliminate the introduction of invasive species into their freshwater ecosystems. The Korkers wading boots are a great option for Alaska, as they have perfected an interchangeable outsole system allowing you to select the proper sole for your wading application. The soles can be felt or rubber, studded or no studs, angler choice.

Korkers River Ops Wading Boots

For my trip in Alaska, I was fortunate enough to snag a pair of Korkers new boots, the River Ops. I had fished in the Korkers Devil’s Canyon boot in Argentina a few years ago but needed more ankle support than what they provided. The new River Ops is all about being heavy duty, and the ankle support is awesome and highly adjustable. The lacing system on the boot allows you to loosen the toe box for maximum volume (super important in keeping your toes warm while fishing in 20 degrees weather and mid 30’s water temperatures) but still locks in your ankle. The laces provided are long enough for any lacing application, and the three sets of cleats on the uppers make micro-adjustments fast and easy, as well as getting them on and off. The boot features exoskeleton outer foot protection, non-exposed stitching for durability and longevity, and the padding inside the boot is comfortable yet very supportive. The boot is completely made of synthetic materials, so they dry fast, which is a great feature when traveling back home after fishing on your last day. The River Ops has an internal drain system that quickly removes excess water and weight, which makes for more efficient wading and walking. For a boot with so many features and maximum support and protection, they are remarkably lightweight. The bullet-proof interchangeable sole is the real feature that makes this boot a standout in my mind. I brought two soles with me, the Vibram XS Trek and Vibram Studded XS. Both soles performed well, but the studded soles were killer on the slippery rocks, especially on one of the glacial rivers we fished where there was an abundance of glacier silt on the bottom. The studs cut right through the scum and bit hard on the rocks. Better traction and better stability equates to better and more efficient fishing in my mind.

I give the Korkers River Ops wading boots high marks. I look forward to wearing them through the winter, steelhead and waterfowl season. Give me a call at 800-669-3474 or shoot me an email at pat@theflyshop.com if you want to learn more about these capable boots.

Tying your wading boot’s lacesTying your wading boot’s laces:
My good friend and former workmate Ryan Peterson showed me this knot years ago and I never looked back. The illustration outlines how to tie the double overhand bow knot. The only thing I would change is that you double the overhand knot tight to the boot (to lock-in the laces tight), before tying the double bow knot. This knot has never failed me once, it always stays tied.  And when you are done for the day, grab one of the tag ends and pull, the knot comes completely undone. Try this knot I think you will like it! I do!

Antelope Fire at Antelope Creek Ranch

800 • 669 • 3474

On the first day of August 2021, we spent the weekend celebrating Mike Michalak’s birthday with most of our family. Mike’s two grandsons, his oldest son, and his daughter-in-law were in town, and they had hit the links and enjoyed some wonderful golf, fun, and food. Mike had turned 75 on Saturday, and we were all in a celebratory mood and feeling happy about life.

Antelope Fire at Antelope Creek RanchThe Antelope Fire
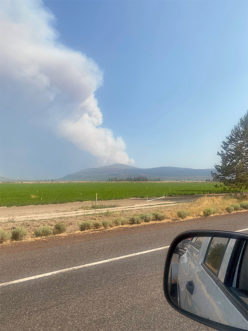
Fast forward to Sunday morning at 10:30 a.m. when we heard about the Antelope Fire, a new fire that had just started near Antelope Creek Ranch (ACR). Living in California and being used to fires constantly springing up everywhere, this new blaze didn’t seem like a particularly big deal. We didn’t even talk about the fire until I arrived at work on Monday morning and Pat Pendergast mentioned it and had the CalFire map on his computer screen. Still, with the Tennant Fire having threatened that area of California and the ranch just a few weeks prior, and with fires in our area of the world becoming commonplace the past several years (Carr Fire, Camp Fire, Herz Fire, Delta Fire, etc.), we went about our day, like we typically do, with the assumption that CalFire or the National Forest Service would take care of it.

Antelope Fire at Antelope Creek Ranch

That Monday we had campers showing up to Antelope Creek Ranch to start a week of FishCamp™. We weren’t concerned to keep the camp going, as the fire hadn’t grown and was still miles from the property. The FishCampers and their parents arrived for drop-off around noon. But only hours later, in early afternoon, we received an evacuation warning, and we took action. We had our camp counselors quietly and efficiently load up every child and their belongings and bring them back to Redding to be picked up by their parents. Our view at the time was, “better safe than sorry.”

By Tuesday morning not much had changed, and we were still monitoring the maps and watching. With bombers dowsing the fire from Klamath Falls, a CalFire team positioned nearby, and our friend Anne (who works for CalFire) keeping us apprised of the activity, it was just another day at the shop. The day progressed with little change, except that more firefighters were being called in to gird the structures and the town of Tennant. The town is tiny yet there were several homes and buildings they were trying to protect. As Tuesday proceeded, the winds began to escalate and cause the fire to grow rapidly. The CalFire crew at this time had moved onto Antelope Creek Ranch and took a position at our FishCamp™ area to combat and protect the ranch. They were also trying to stop the northeast movement of the fire.

On Wednesday all hell broke loose. Mike Michalak had started his day with a text from Sig, the ranch caretaker and manager, asking Mike to bring some supplies and the compressor for the fire truck. Sig had already used the fire truck to foam all the walls of the buildings and was planning on hitting them again if necessary. But two hours into his drive to the ranch, Mike received a call from Sig that he and CalFire had had to evacuate the property after being chased off by the fire. Grabbing everything he could reach at a moment’s notice, Sig jumped in his truck and raced down the gravel road as the fire was crowning through the trees all around them. Sig later recounted that he was driving 40 mph off the property, and the fire was overtaking them. Mike met up with Sig at the Highway 97 and Tennant Rd intersection, where Sig informed him that he thought everything was lost – a total devastation of the property and all the buildings destroyed. They proceeded to drive to Mount Shasta so they could talk and gather themselves. One can only imagine what was going through their minds on that one-hour drive.

Thursday morning we all woke up with heavy hearts. The thought of losing Antelope Creek Ranch was devastating to our family and TFS staff, not to mention the owners, Mike and Bertha Michalak. I met with the staff at the shop on Thursday morning to discuss how we would answer questions and move forward. The message was simple and true: We still didn’t know exactly what had occurred on the property, and until someone was physically able to see it, we decided against speculating or saying anything more. Bryan Quick and Chris King jumped into action, moving a three-day school from ACR to Oasis Springs Lodge and calling those anglers who were supposed to come to the ranch the following week. There was a lot to be done in a short time, and the team got it done.

Thursday evening I got a call from Mike after he had gotten word of what had occurred on the property, thanks to a family friend. The friend had asked his co-worker, a CHP officer, to visit the property and take a look. Mike, who hadn’t slept a wink and was in a state of despondency, got a phone call from his friend with the report, and he also received some photos the officer had taken while on the property. This was the first news we had received since the evacuation on Wednesday afternoon and fearing the lodge was a total loss.

The Outcome
While Mike was on the phone with his friend from the CHP, he heard wonderful news. The majority of the ranch had survived! Not only were buildings still standing, but the sprinkler system was working, and the officer heard the generator running. It should be noted that this was the first day after the fire had rushed through the ranch. The smoke was unbelievably thick, so you couldn’t see much, and several stumps were still on fire and smoking.

Mike and Bertha Michalak were notified late Thursday afternoon that they could be escorted onto the property Friday morning for two hours. Of course they jumped at the opportunity. Who wouldn’t? They were on the road from Redding at 5 a.m. that morning and were ready to see for themselves what had been reported, and they picked up Sig on the way. As they drove down smoke-filled Tennant Road (12 miles from Highway 97), the eerie feeling of loss and devastation was on their minds. Yet, they all had a spark of hope in their hearts.

Antelope Fire at Antelope Creek Ranch

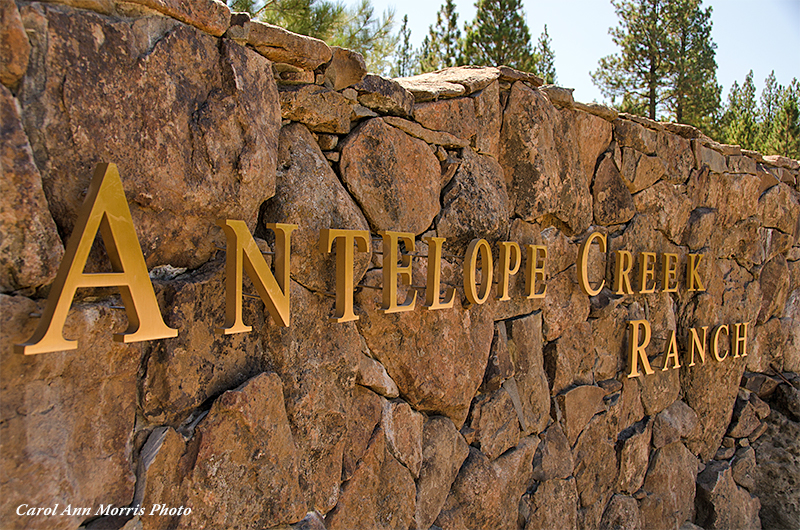
As they pulled up to the entrance of the property, they noticed the mailboxes lying on the ground, as their posts had been burned out from beneath them. But the rock wall with the ranch’s name stood strong and proud. The gate was open, as CalFire had been on the property with their water trucks and fire team.

Immediately they noticed that homes adjacent to their property were no longer standing. Sadly for the neighbors, the fire had been devastating. Imagine that as your first view once you drive onto the property … it certainly didn’t give Mike and Bertha a lot of hope for their own buildings and structures.

Antelope Fire at Antelope Creek Ranch

It was an eerie and smoky drive up the gravel road toward the ranch house, but overall, the trees looked healthy and mostly unscathed, with only some scarring on the tops and bottoms. Many of the trees seemed largely untouched and unphased.

Antelope Fire at Antelope Creek Ranch
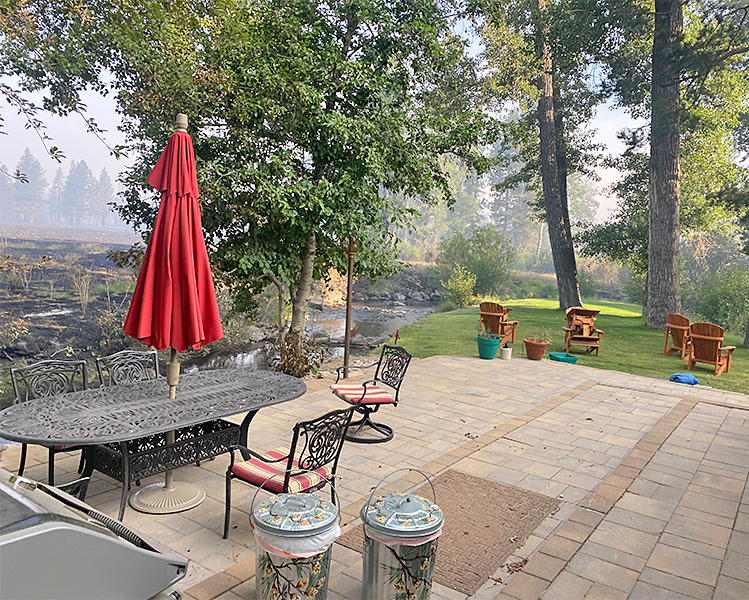
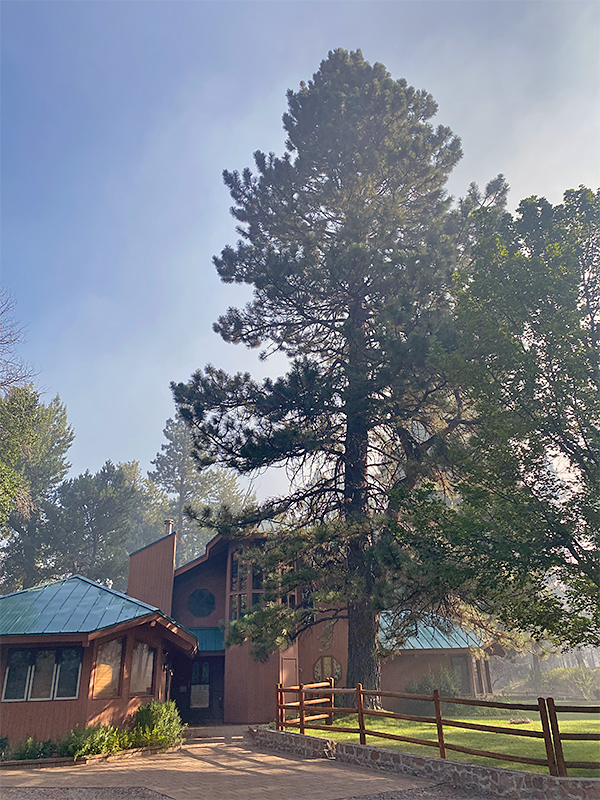
They experienced a surge of relief when they approached the ranch house, as it stood like a beacon of light with not a single burn mark. The grass was as green as it has always been, the Adirondack chairs still reclined in the lawn area by the fire pit, and cornhole boards were still stacked on the patio steps. Even the table umbrella was up without a mark, and flowers bloomed brightly in the driveway roundabout planter. It was an amazing feeling, giving Mike and Bertha an enormous sense of relief. The home had been spared!

Antelope Fire at Antelope Creek Ranch - Picnic Area
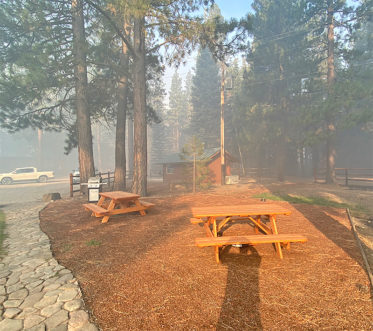
The next stop was the guest suites and staff quarters. Taking a deep breath and jumping back into the truck, they headed up the driveway to turn south toward the shop and guest suites. Again, to their surprise, they could see all the guest suites, including the wood fencing, standing unharmed. Unbelievable! The shop, or what was left from the planned demolition, was also standing with no harm. The picnic area outside the guest suites was in perfect condition. This area has wood picnic table as well as wood chips, and amazingly it was all spared from the carnage.

Fishcamp Tent
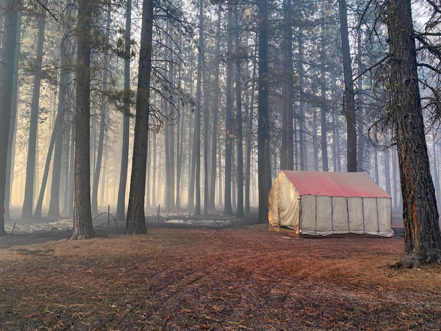
They then headed to the FishCamp™ area of the property, which is down a short drive from the guest suites. The first sighting there was of a single FishCamp™ tent still standing. The white, canvas tent stood proudly among the trees. The other five tents had burned to the ground, damaging the platform structures as well as melting the tent poles. Per Mike, “The tents got so hot that the metal poles turned into spaghetti noodles.” Continuing up the path, the FishCamp™ cookhouse, appearing in the smoke, was also standing. Not a scratch or mark on it. How incredibly fortunate, Mike and Bertha said to each other. They couldn’t believe that this building was still in one piece.

Antelope Fire at Antelope Creek Ranch - Picnic Area

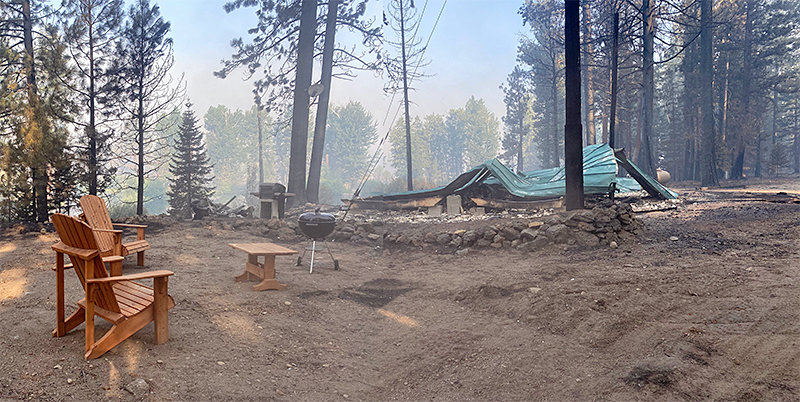
They were running short of time for their two hours of inspection; there was still so much to put eyes on and not enough time left to see it all. They needed to head to Sig’s place, which overlooked the upper lake. Unfortunately, when they came around the corner, they saw the first major devastation on the property. Sig’s house had burned completely, and the roof had collapsed on the remaining ash. But fortunately, Sig got most of his personal belongings out before being evacuated, although he did lose some family memorabilia that can never be replaced as well as all the furniture and clothing. Sig is an avid cyclist, and luckily most of his bikes were in a culvert on the property that went unharmed. However, one of his best bikes was inside his home and didn’t make it through. The beautiful wooden deck that wrapped around the home was gone, but surprisingly two barbecues and two Adirondack chairs survived.

Antelope Creek Ranch historic barn

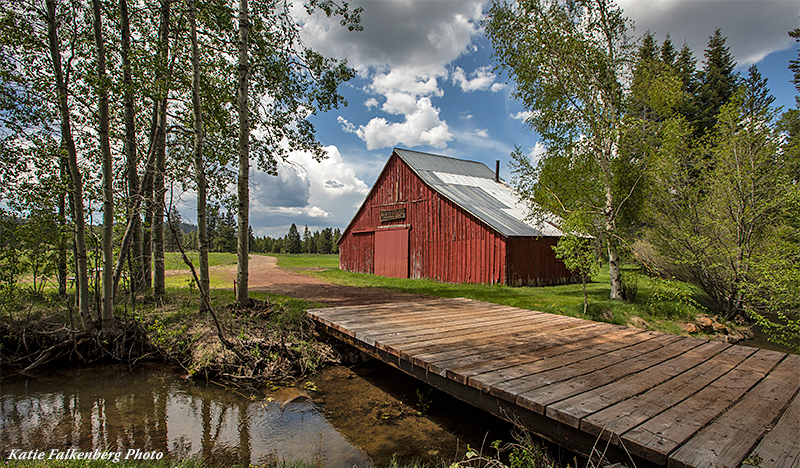
The last stop they made that day was at the historic red barn on the other side of the stream. If you’ve ever been to ACR you’ll remember this little barn. It had a lot of significance as the oldest building on the property. The more than 100-year-old structure and its contents had been turned to ashes. It is sad to think that we will never have another casting lesson in front of that barn. It was picturesque to say the least, and family members had taken pictures there for their Christmas Cards and personal use. Unfortunately, this barn can never be replaced.

ACR historic barn remnants

By this time the Michalaks had to leave the property, as they had exhausted their two-hour window. Talk about an emotional roller coaster – thinking that everything was lost, then seeing pictures and hearing that some things still survived, to finally setting foot on the property to see the damage with their own eyes.

Saturday came with much optimism and thoughts of reopening the ranch and getting back to having fun at this outdoor fun center. Mike and Bertha got a call that day letting them know they could go back on Sunday, as the property was no longer in threat. Since there was still very little power and fires continue to linger, they couldn’t stay the night, but at least they could spend the entire day there.

Mike and Bertha, along with their long-time friend Bert, got in the truck early Sunday morning and headed back to ACR, again stopping in Mount Shasta to pick up Sig. Bert, a retired heavy equipment operator who has done work at the ranch in the past, was invited along to check out the heavy equipment and, if necessary, run it to clear roads.

Antelope Fire at Antelope Creek Ranch - Picnic Area
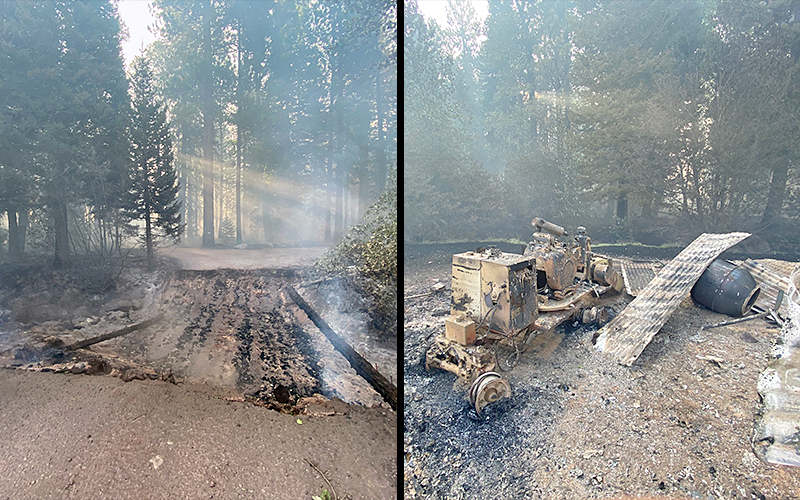
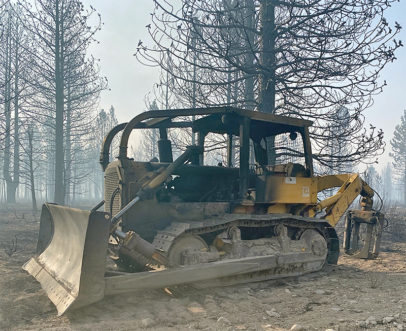
This was a happy yet somber day. With more time on the ranch the team was able to see the entire property and evaluate what damage was truly done. All the equipment and vehicles, which Sig had parked in the meadow, were in perfect condition. The only loss was a tractor that had been inadvertently left in a forested patch. The bridge by the historic barn had been burned to the ground. They made it past this point and headed to the air strip. (Most guests to Antelope Creek Ranch have never been out to this part of the property.) Once arriving they found the vehicles on the runway were in perfect order, as were the fuel tanks. But the same could not be said of the hanger. It was burned badly and everything inside was a total loss. The maelstrom swept quickly through the largest, most heavily wooded and well-established parts of our ranch like a massive, controlled burn, leaving in its wake charred tree trunks and a denuded forest floor. Some distant and seldom-visited portions of woods on the ranch were completely destroyed.

Planning for the future
So, what is the plan for Antelope Creek Ranch? The plan is simple: We will be open for business again in the spring of 2022 (opening is generally around May 10). ACR will be back, with a bit of a facelift, and better than it was. That’s Mike’s promise to each and every guest. Although there are tough times ahead and a lot of work to be done, he and Bertha are eager to get started on the cleanup and rebuilding.

Antelope Fire at Antelope Creek Ranch

The ash should spark an abundance of spring wildflowers, and we expect our meadows to explode with lush growth this next spring and summer. We’re going to dedicate the remainder of the summer and fall to restoring the beauty of Antelope Creek Ranch, implementing an aggressive re-planting of the forest where necessary and finalizing some lake enhancement and stream restoration. The ranch house and guest suite complex look just as beautiful as they ever have, and with the “bad” will come new improvements. Mike said, “I feel like the Phoenix rising from the ashes and can’t wait to make it even better. When we open next May, guests can expect to encounter an Antelope Creek Ranch more beautiful than ever and the same superb fishing and lodge experience that’s built an incomparable reputation among discriminating fly anglers.”

by Terry Jepsen

Proper Disposal of Your Tippet & Leader Materials in Fly Fishing

800 • 669 • 3474

Proper Disposal of Your Tippet & Leader Materials in Fly Fishing

Fly fishers are conservationists at heart and stewards of the land. However, one area where we might sometimes fall short is with proper disposal of tippet and leader. We are all responsible, on some level, for contributing bits and pieces of monofilament and fluorocarbons into our waterways. Maybe it’s a tiny piece of tippet trimmed from a fly you just tied on, or maybe it’s a wad of tapered leader that has seen better days. No matter what size or material, we need to do a better job of disposal.

Monofilament and fluorocarbons are meant to last a long time by design. It is estimated that monofilament takes 600 years to decompose and fluorocarbon up to 4,000 years. This stuff is going to be around a long, long time – well past our days on the water.

What can anglers do to help?
Fishpond Largemouth PIOPODThe first thing we can do is be responsible for ourselves and our trash. The second would be to help clean up any mess or trash that we find. We’ve all walked or floated by a log in the water with monofilament wrapped on it. Instead of expecting someone else to take care of it, this is a great opportunity for us to cut it off that tree and put it in our PIO (Pack It Out) Pod, garbage bag, pocket, vest or pack for proper disposal.

What is proper disposal?
Proper disposal of monofilament and fluorocarbons is trickier than it sounds. Instead of just throwing it in the garbage, where it will be for decades, consider these options:

• Take it home and collect for a bit prior to recycling
• Use a Trout Unlimited monofilament recycling station
• Use a Boat US Foundation recycling station (Reel In & Recycle)

How do I recycle my monofilament and fluorocarbons?
This is actually easier than one would think. Many fly and tackle shops around the country have a bin for recycling mono and fluoro. Check with your local fly shop or tackle dealer to see if they have a program in place. If they don’t, you can collect your own mono and fluoro, and send it off to be recycled properly. You can do this by sending it to:

Berkley Recycling
1900 18th Street
Spirit Lake, Iowa 51360
https://www.berkley-fishing.com/pages/berkley-recycling

From Berkley: “Since 1990, the Berkley Conservation Institute, with the help of anglers everywhere, has recycled more than 9 million miles worth of fishing line. That’s enough line to fill two reels for every angler in America.”

What’s the big deal? How is this helping anything?
As we stated earlier, monofilament and fluorocarbons take a very, very long time to biodegrade. Material discarded along a waterway will sit for years, tangled in a tree branch, or worse – wrapped around a bird or other animal we love to see while fishing. With a little stewardship and planning we can help keep our favorite fisheries free of garbage and safe for the critters that live there.

Proper Disposal of Your Tippet & Leader Materials in Fly Fishing

Our own Eric Fields was fishing Cow Creek a few months ago and watched swallows make the nests under a bridge using the mud of the river bank. He noticed one that was sitting there in the mud, but wasn’t flying back to pack the nest. Eric decided to take a break to see if this bird needed help. When he got over to it, he realized the poor thing was wrapped in a monofilament line and unable to fly and barely stand.

Amazingly, the tiny bird allowed Eric to pick it up. Once in his hand he realized that this bird was in more trouble than he thought, because there was a large quantity of small diameter monofilament wrapped around its feet as well as one of its wings. As Eric started removing the mono, expecting the bird to freak out and attack him, the bird stayed perfectly still and allowed him to cut and unwrap the mono from its feet. Then Eric moved to the wing that was stuck to its side. This tiny bird allowed him to delicately lift each wing and check for mono as well as cut the one wing loose. Once he could see no more monofilament wrapped on the bird, Eric turned the bird upright and opened his hand to see it fly away happily.

We found this amazing video from The Epoch Times, where a hawk is tangled in a fishing line on the side of a river. This video was the inspiration for this post, and we hope everyone takes a couple of minutes to watch:

https://www.theepochtimes.com/rescuing-an-entangled-hawk-from-fishing-line_3829544.html

Gear Review: The Hatch Iconic Fly Reel

800 • 669 • 3474

Gear Review: The Hatch Iconic Fly Reel
By Justin Miller

Good things come to those who wait …

The much anticipated new Hatch Iconic reel has finally dropped and is available to the public! We have been looking forward to this for well over a year, but the lousy pandemic ruined even the best laid plans. When California locked down the state, Hatch’s original launch date for the Iconic got lost. And once they were finally allowed to go back to work, they started pushing again and have gotten all caught up with an army of reels ready to go today! Your patience has finally paid off!

I was extremely fortunate to get an early crack at taking one of the brand new Hatch Iconics out for a test drive — Hatch sent me an 11+ Iconic fresh off the CNC machine, and I took it to the world of fly fishing’s ultimate proving grounds — Providence Atoll in the Seychelles! I loaded up the grey 11+ they sent me with over 350 yards of Hatch 68lbs PE Line backing and a 100lb core Scientific Angler Amplitude Big Water Taper and 130lb fluorocarbon leader. I was ready to pick a fight with the devil himself and try my best to destroy the reel in the process!

Gear Review: Hatch Iconic Fly Reel

Right away I was in love with the Iconic. It was everything I had come to love in the Finatic but more refined. The drag was butter smooth with no pulsing, no hard start up inertia, and the drag knob was very easy to adjust and micro-adjust. I never had it slip or stick. Managing the drag is a big deal in the Seychelles when chasing GTs. I have never adjusted a reel so much during a day in my life. You are constantly loosening and tightening. GTs are absolute beasts, and there is coral everywhere, so you crank the drag to about three clicks short of the max and try to rip their soul out before they can get to safety and sort you out … but I promise that you cannot pull the line off of the reel yourself! So, every time you get to a new spot you have to back the drag all the way off, strip out the 80 feet that you need to cast, then crank the drag back to ridiculous. Back and forth, on and off, all day. The large drag knob and the smooth strong settings made this constant process easy.

Gear Review: Hatch Iconic Fly Reel

Providence Atoll is a target-rich environment to say the least! That reel had to hold its own and fight a lot of big GTs during the week, and it never stumbled. It absolutely took care of business going toe to toe with the “gangster of the flats.” The new Hatch Iconic will stand among the best saltwater reels on the market today, without a doubt.

Materials
Just as the previous models, the new Hatch Iconic is fully machined from bar stock aluminum. These reels are as tough and durable as is humanly possible. Hatch also machines the reel foot to the frame body in one piece, not screwed on like most other reels on the market. You never have to worry about a loose reel foot with Hatch.

Note: Older Hatch models are not compatible with the new Hatch Iconic. Finatic Spools will not fit Iconic frames or, vice-versa.

Drag & Clutch:

  • Hatch completely rebuilt the drag system when they were designing the Iconic.  The newer carbon-filled drag material dissipates heat faster and also creates a smoother feel when fish are ripping away.
  • One of the Finatics’ issues was water getting inside the drag housing and eventually causing issues with the reel, such as pulsing. Hatch addressed this issue head on and greatly improved the sealing of the drag by removing the old Allen wrench access and providing an entirely new seal as well as eliminating any chance for water seeping into the drag and clutch assembly.

Hatch Iconic Fly ReelsColors:

  • Black w/ Silver lettering and hub
  • Grey w/ Black lettering and hub
  • Clear w/Blue lettering and hub
  • Clear w/Red lettering and hub

The NEW Hatch Iconic is a superior reel, a newly designed fish fighting tool, that will handle the toughest and largest game fish in the world, yet delicate enough to protect the lightest tippet!  With an unbeatable and improved carbon-filled drag, newly designed and sealed clutch system, machined reel foot, heavily ported spool and frame that facilitate faster line and backing drying, one piece spool nut, oversized ultra-adjustable drag knob, and redesigned handle and counter weight, we couldn’t be happier with this reel.

It was definitely worth the wait.

— Justin Miller

Run From the Sun – Ways to Protect Yourself While Fly Fishing

800 • 669 • 3474

Run From the Sun – Ways to Protect Yourself From The Sun While Fly Fishing

Many of us remember the days of the sun gods and sun goddesses. Heck, your parents were probably part of that era, going shirtless during their fishing days or wearing only a bikini to make sure they soaked up as many rays as possible. They even went as far as smearing coconut or baby oil on their skin (sometimes spiked with iodine) to get as much bronze coloring as possible. Those days are gone and for good reason. Skin cancer is the reason for this evolution, and we now find ourselves covering every inch of ourselves with either clothing, hats, sleeves, or environmentally friendly sunscreens.

Run From The Sun Protective Clothing
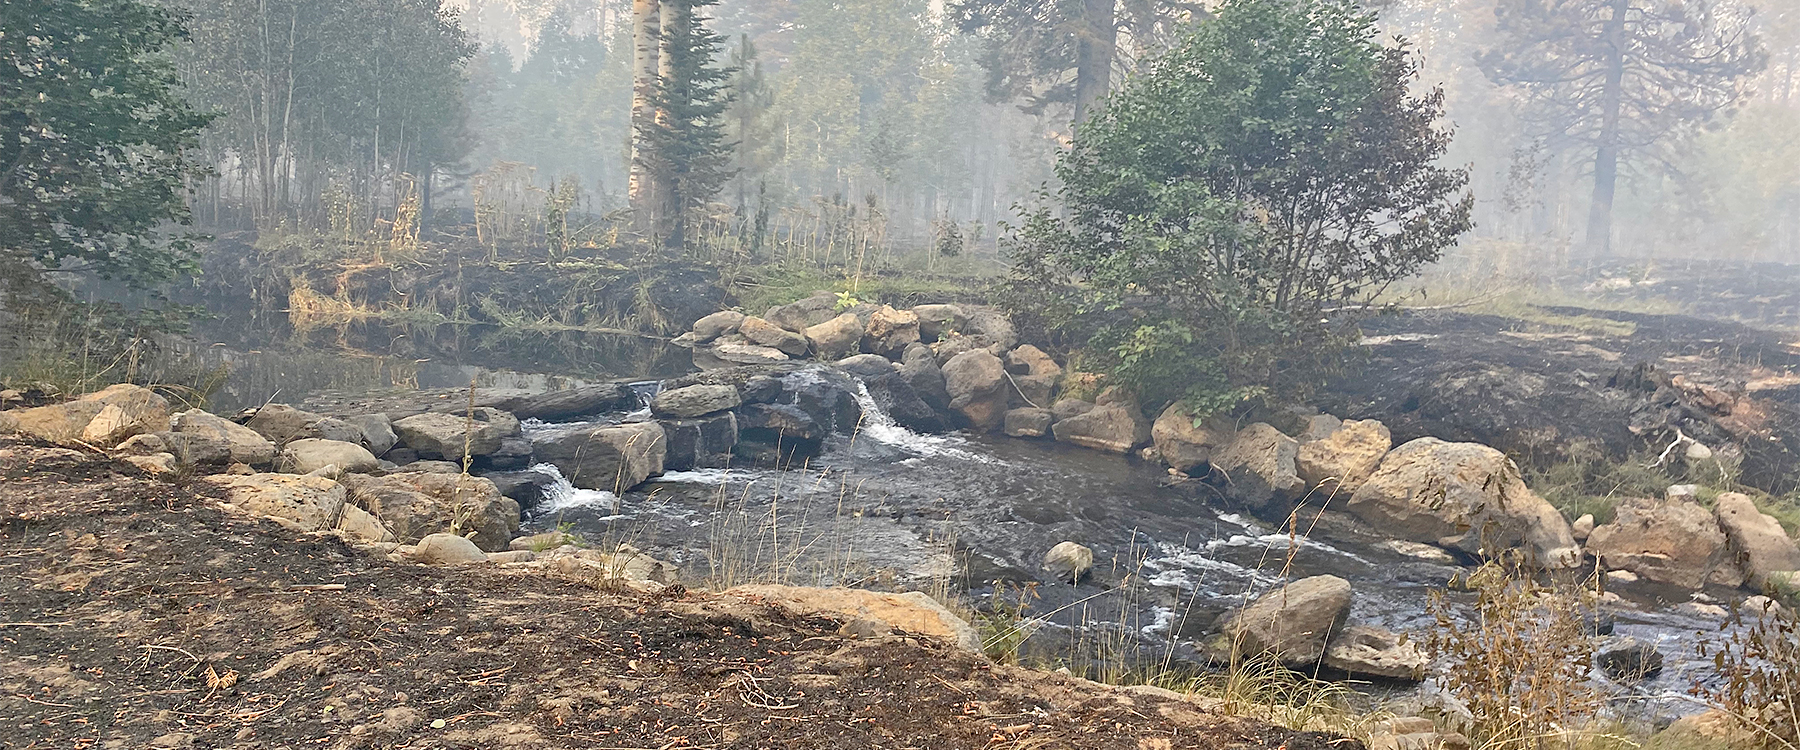
Like lots of other things in fly fishing, sun protective clothing has experienced dramatic changes over the last 10 to 12 years. Many shirts are designed specifically to mitigate sun exposure, using SPF 30+ or SPF 50+ fabrics to help keep us safe from the damaging effects of UV (ultraviolet radiation). UVs are invisible rays that come from the sun, can burn the skin, and cause skin cancer. UV radiation is made up of three types of rays — ultraviolet A (UVA), ultraviolet B (UVB), and ultraviolet C (UVC). In addition to providing sun protection, these shirts help you keep cool, allow for easy movement when casting, and look great. For maximum sun protection while on the water, look no further than the Patagonia Capilene Cool Daily Hoody or the Simms Solarflex Hoody. These hooded, breathable shirts are where form follows function and add comfort to protection. We like the function of these shirts, as the one piece hood to shirt design protects the back of your neck from the sun, as well as the sides of your face and ears.

The head and face are also very susceptible to harmful sun exposure. And remember, the exposure is not just from the sun above, but the sun’s reflection off the water. In fact the reflection off the water is often more intense and potentially damaging than the direct sunlight. This is where a Buff® can make a big difference.

We’ve watched more fly anglers switch from the old baseball-style cap to something with a large brim for this exact reason. These vary greatly in design, from a floppy Gilligan or Boonie style (Simms Superlight Solar Sombrero) to the cowboy style (Fishpond Eddy River), to the comfortable straw hat (Sonora Straw Hat). There is something for everyone’s style and fit.

Not into wearing a big floppy sun hat when fly fishing? That’s okay because like we said, “There is something for everyone.” For those who still want to wear their favorite ball cap, a neck and head gaiter like a Buff®, Gaiter, or Shade Flap is a great option. Buff® changed the way we protect our neck and face when they designed their original tube years ago. This, of course, has been modified and updated to what we wear today. The four-way, seamless, stretch fabric construction features UPF 50+ sun protection, the standard in fly fishing, and is extremely comfortable to wear.

Sunscreens have also changed over the years, especially in the environmental capacity. In previous years the water, reefs, and fish species weren’t thought of when anglers smeared on their sunscreen protection for the day. Oxybenzone, Ooctinoxate and octocrylene, chemicals used in sunscreens to protect skin from damaging UV light, are bad news for corals because they increase a coral’s susceptibility to bleaching and damaging coral DNA, which interferes with reproduction. Additionally, these chemicals are hard on fresh and saltwater fish. However, there are companies that now produce sunscreens that are coral, water, and fish friendly and don’t harm the environment when washed off. We like that in sunscreen and recommend products from Fishpond and Stream2Sea. You may also have a favorite, and we would love to hear about it.

Below is a list of some of our favorite sun protection products that keep you on the water, into fish, but out of the sun’s harmful rays.

Patagonia Tropic Comfort Hoody II

Sun Protection Shirts

Patagonia Capilene Cool Daily Hoody – $55.00 – $65.00
In high heat and humidity, the Capilene Cool Daily Hoody is the next best thing to a cool breeze. The stretchy, ultralight 94% polyester/6% spandex fabric provides UPF sun protection, wicks away perspiration, and stays fresh with Polygiene permanent odor control. With a relaxed silhouette and soft, cotton-like feel, you can stay comfortable and focused on the fishing.

Skwala Sol Hoody and Sol Tactical Hoody – $89.00 – $119.00
The newest in sun protection from Skwala Fishing. These shirts, although different, are the same. Both these hooded sun shirts provide the utmost protection from the sun with a 50 UPF rating and the choice becomes the thickness of the garment. The scuba hood on both adds extra protection from the sun while still giving you great vision. Add the side pocket(s), 2 on the Tactical Hoody, and you’ve got a shirt that will block the sun yet be comfortable throughout the day.

Patagonia Capilene Cool Crew – $59.00
Patagonia’s most versatile performance knit provides 50+ UPF sun protection while on the water. The HeiQ® Fresh durable odor control keeps your shirt fresh and your fishing partner happy. These technical tees are made from 100% recycled fabric, and will keep you cool, comfortable, and sun-protected in the harshest and hottest conditions.

Simms SolarFlex Guide Cooling Hoody – $119.95
When the sweltering sun threatens to end a long afternoon of tossing carefree casts, cover yourself with the Simms SolarFlex® Guide Cooling Hoody for men. The quick-drying comfort and UPF 50 sun protection of lightweight COR3 ™ fabric lets you keep chasing that elusive two-footer through the dog days of summer. The durable and flexible sleeve construction supports a range of movement, letting you cast from any angle. The hoodie features a flat-seam finish that creates a plush, next-to-skin feel.

Patagonia LS Sun Stretch Shirts – $99.00
If you are not into hoodies and prefer a more traditional button-down shirt then the Patagonia Sun Stretch is a great choice. It offers 50+ UPF sun protection, a quick drying fabric that is comfortable, and the stretchy material allows for full movement while fishing. Paired with a Buff® and good sun hat, you will be good to go on your next sun-filled fly fishing adventure.

Fishpond Eddy River Hat

Hats & Headwear

Fishpond Eddy River Hat – $59.95
The sweeping round curved brim and the pinched crown of a cowboy hat was possibly the most defining symbol of the American West. This hat was developed to provide maximum protection from the sun, rain, snow and stand up to daily abuse. The folks at Fishpond have lived under these hats for decades and wanted to add their own spin to the American tradition with the Eddy River hat, complete with Fishpond’s signature Brown Trout jacquard webbing hat band.

  • 5″ Brim
  • Guatemalan Palm

Sonora Straw Hat – $15.00
Soft and supple, comfortable, with two sizes to choose from, and perfect for those of us who are becoming more cognizant of potential sun damage. This has been a favorite hat for some of our local guides for years here in Redding. And believe us, we know heat and sun here…

Coolnet UV+ XL & UV+ Bugslinger Buffs – $24.00
The do-it-all performance piece that can be worn 12+ ways, from a face cover to headband, balaclava to beanie. The four-way ultra stretch, seamless fabric construction is soft and cozy, made from 95% recycled REPREVE® microfiber. With UPF 50 sun protection, these products are approved and recommended by the Skin Cancer Foundation as an effective UV protectant for covered areas.

  • Bugslinger comes with built-in bug deterrent

Simms SunGaiter – $34.95
Simms SunGaiter helps you spend more time on the water with less sun exposure. Made from lightweight, quick-drying stretch fabric, it features laser-cut breathing holes, so you don’t feel like you are breathing through fabric and can prevent your glasses from fogging up. The SolarFlex fabric offers UPF 50 protection and will cover from the top of your nose down to your shirt collar.

Shade Flap – $8.95
The easiest way to add sun protection to your neck and ears while still getting to wear your favorite fishing ball cap. Just slide this flap onto your favorite hat using the elastic band and you are ready to go. It’s a simple solution and fully adjustable to fit any lid or head.

The importance of Sunscreen

Sunscreens

Fishpond Sunscreen – $9.95
Protect yourself from harmful UVA/UVB rays with this all natural sunscreen. Fishpond has developed these products in conjunction with Joshua Tree, an industry leader in organic skin care. This sunscreen is reef and fish safe and water resistant for up to 40 minutes.

  • SPF 30
  • Fly-line safe
  • 2 oz

So we are all covered up with shirts, hats, neck gaiters, and sunscreen. But there is something else we often forget about protecting from the sun — our feet. I don’t know how many times I have burned the top of my feet while on a flats skiff fishing. I don’t wear shoes because I want to know when I am standing on my fly line. So now, I bring a pair of socks to protect my feet from the sun. They work great as a physical sun barrier, and I can feel anything I am standing on.

Father’s Day Fly Fishing Gift Ideas

800 • 669 • 3474

For many of us, this is our favorite time of the year. The weather is warming up, the flowers are blooming, and the fish are rising. We just finished celebrating mothers in May, and now it’s time to turn our attention to fathers.

And many of us are now looking for that perfect gift to tell Dad that he is thought of and loved. Here at The Fly Shop® we want to help in any way we can, so we’re providing a few of our favorite Father’s Day gift ideas below to make your shopping easier.

Need additional help or suggestions? Give us a call at (800) 669-3474 — we’re always happy to help!

Mother’s Day Fly Fishing Gift Ideas

800 • 669 • 3474

It’s early May, which means Mother’s Day is just around the corner. From waders to hats to guided trips, we’re sharing a few ideas to help you find the perfect gifts for the special women in your life.

Need additional help or suggestions? Give us a call at (800) 669-3474 — we’re always happy to help!

Abel Reels Revamped – A Look at Abel’s Advancements in Fly Fishing Reels

800 • 669 • 3474

Abel Super Series - Original (Brown Trout)

Abel Reels Revamped

A Look at Abel’s Advancements in Fly Fishing Reels

Over the past several years Abel Reels has redesigned their entire lineup of fly reels. Many of you remember Abel’s original series of fly reels, including the infamous 3N, a standard for serious permit and bone fisherman for years. And don’t forget the  “Super Series”, which helped put Abel on the map and possibly responsible for more IGFA world records both in fresh and salt water than any other reel. This workhorse of a reel, with new modifications, is still in production. But recently, Abel has redefined the reel industry with the introduction of their Sealed Drag Series, the SDS (saltwater) and SDF (freshwater).

Abel SD (Original) - Brown Trout graphic
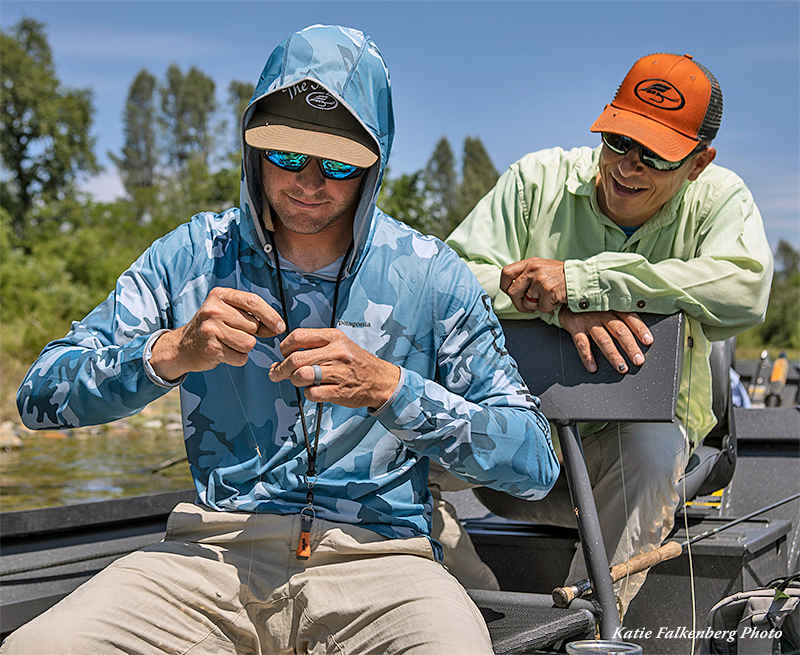
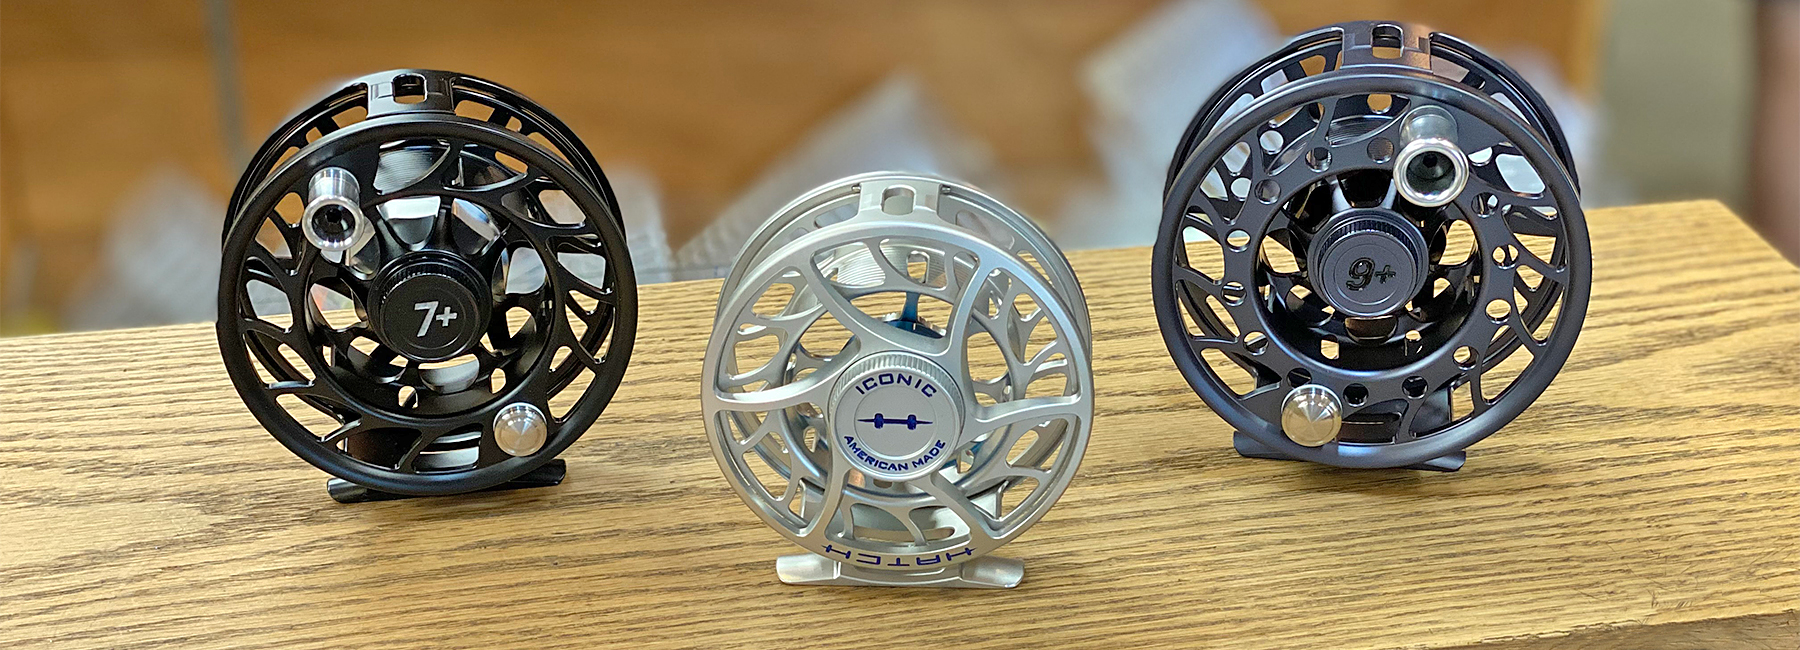
Abel’s debut of their first Sealed Drag reel was in 2013, a completely new drag re-design from their classic exposed cork drag system. At this time Abel was working with Joe Saracionne to engineer and create something unique and different. This reel stayed in the line up for a couple of years before Abel took the sealed drag concept to a higher level.

Abel’s newly designed drag system was first installed on Abel’s SDS (Sealed Drag Saltwater) reels. Not long after, the newly introduced sealed drag reels took the industry by storm. The SDS was winner of the best new saltwater reel at the 2016 ICAST/IFTD and the SDF followed suit as the winner of the best new freshwater reel for 2018 by Fly Fisherman Magazine and Best of Show at the 2018 ICAST/IFTD.

Top Six Fly Fishing Nippers and Why

800 • 669 • 3474

Top Six Fly Fishing Nippers and Why!
(Life is too short for crappy nippers)

Is there anything more frustrating than trying to snip a piece of tippet off the fly you struggled tying on in the waning hours of light on an evening hatch (see 20/20 MAGNETIC TIPPET THREADER), and they won’t do their job?! Nippers that work well are an essential piece of fly fishing gear and probably the single most used tool in our kit that we take for granted, that is until they fail. And then we find ourselves gnawing on the tippet to get it cut, something we get chewed out for by our dentist twice a year. So how do you avoid all the headaches with dysfunctional nippers and keep your dentist happy? Invest in a quality set of nippers … life is too short for crappy nippers.

What it really comes down to is this:  Do you want to fish, or mess around with tags and knots? True, you can use nail clippers, pliers, your hunting knife or the Mk-I Nipper (your teeth). However, none of these are specifically designed to perform the precision job of clipping a small diameter strand of monofilament cleanly and efficiently. Take it from us, investing in a solid set of nippers will pay dividends in terms of saving time spent cleaning up your tags on the water and that translates into having your fly in the water longer and more fish to hand.

Choosing Your Next Fly Tying Vise

800 • 669 • 3474

Choosing Your Next Fly Tying Vise

A collaboration of ideas with Mike Mercer and Justin Miller

When you first start tying flies, you learn on what you have, which is often someone else’s old rickety hand-me-down vise or some cheap thing that came in a beginners kit. But if you get hooked by the fly tying bug like we have, you will want to upgrade your vise pretty quickly. This is the most foundational part of the entire process, the tool that you will use for every fly that you crank out over the next decade, or even lifetime … it is not a decision to be taken lightly. So, the following are a few of our suggestions about what to take into consideration the next time you upgrade your fly tying vise.

Rotary vs Standard: Which vise style is best for you?

StandardMike Mercer

Standard Vise Diagram
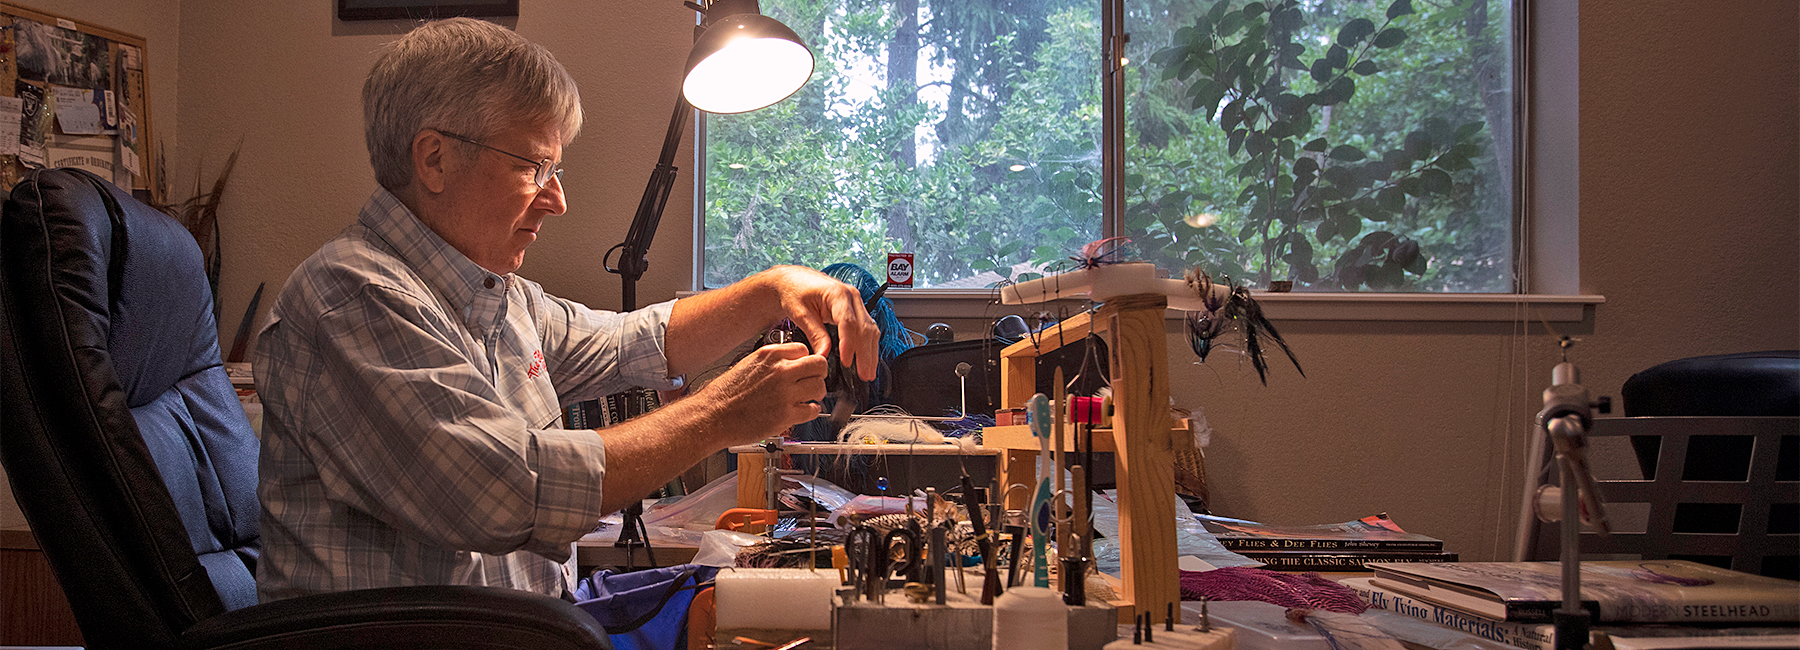
While most standard vises will rotate, the angle of the hook shank does not remain horizontal.  So if you are simply rotating to inspect the other side of the fly (to make sure it is as cleanly tied as the near side), standard vises function perfectly. They also often have simple designs without a lot of adjustment knobs, though this will vary between models. I have spent nearly my entire tying career using Regal and Dyna King vises, and while they are both at the top of their respective games, they are also significantly different from each other.

For the majority of my tying, I love the simple, straightforward features of the Regal. Its unique large lever and spring clamp design instantly adapts to whatever size hook you are tying.  Instead of manually opening the jaws adequately to accept the hook (as with most vise designs), then manually closing them to the correct pressure (with a levered cam lock) while being careful not to exert too much pressure and risk damaging the hook (or setting the jaw opening too loosely, allowing hooks to frustratingly move as you tie), with the Regal all you do is open the jaws with a pull on the large, comfortable lever, insert the hook into the jaws, then release the lever. The vise automatically adjusts to provide the perfect jaw pressure to hold whatever size hook you are using. It’s really a pretty remarkable feature. Changing between a #2 streamer and a #18 dry fly requires no adjustments of levers or cams to properly accept and hold vastly different sized hooks, which I find highly useful. For me it is not about the time savings, as that is relatively minimal; rather, it is the elegant simplicity of the design, and never having to think about making adjustments for various hook sizes. The standard jaws that come with the Regal are perfect for a wide range of hooks, although they are a bit blunt for small hooks. For tying all my trout patterns, I install Regal’s midge jaws, as they are perfect for flies in the #6–#20 range.

Mercer at the Vise
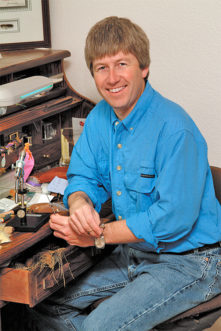
If I am sitting down to tie a bunch of tiny dries or nymphs – #20 or smaller – I will pull out my Dyna-King. This has nothing to do with the vise’s ability to more firmly hold the small hooks; it has to do with the actual design of the vise jaws. With the standard jaws that come with this vise, I can comfortably tie down to #18 flies. The jaws are thin and tapered to a rounded point that grasps a tiny portion of a small hook’s bend firmly, without intruding into the tying space between the hook’s shank and point. Additionally, the vise’s cam locking lever, once adjusted appropriately, locks tiny hooks solidly into place. If I install the midge jaws, tying flies even as small as #22 becomes relatively easy (about as small as I ever tie, and even then grudgingly). The Dyna King standard-style vises are beautifully-machined, precision instruments, and while they demand a bit more adjusting and maintenance than the Regals, they will often be the best choice for those tying a majority of tiny dries and wets.

True RotaryJustin Miller

True Rotary Vise DiagramFull rotary vises are a relatively newer development in vise technology, but they have still been around long before my time. The idea is that as you spin the vise, the hook shank will always stay centered and level, with the hook shank itself being the axis of rotation. It is a great help for a variety of tying techniques, from palmering hackle, to working on the bottom side of the shank, to just checking out the backside of your fly. I love that the hook shank is always straight and flat – I can’t live without it!

Justin Miller at the Vise
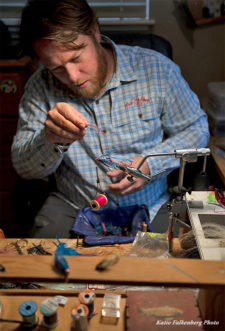
I have been tying on a Dyna-King Barracuda Junior for over 15 years. It is hands down my favorite vise. All of the Barracuda series vises are phenomenal, but the Junior is a little simpler, compact and lightweight. I take my vise with me on the road and in airplanes frequently, so all of those features are a big benefit, without any noticeable sacrifice in quality or performance.

Opposite of Mercer, most of my flies are very large. I am a steelheader above all else, so I frequently tie on hooks in the #2 to #2/0 range. I also tie a lot of saltwater streamers and crabs and other big stuff like that. The jaws on the Dyna-King are outstanding when tying on big hooks, even when you are really wrenching on them with heavy thread. All of the Dyna-Kings have a groove in the jaws that the bend of the hook fits into. This really keeps the hook from moving when the jaws are locked tight. The jaws can be very precisely adjusted, and then when you lift the arm to close the jaws you can feel the tension before you feel it click and lock into place. I have never had a hook come loose from my Barracuda, and I really reef on those big bugs. These aren’t some delicate Parachute Adams!

Also, when I am tying these larger flies, I love being able to spin the full rotary function and see the back of the fly still level, and I will often rotate the fly to be upside down and tie materials on the top, which is actually the bottom of the fly. I really can’t tie on standard vises for long anymore without getting annoyed that they don’t stay level when spinning the handle!

Pedestal vs C-clamp
Most high-quality vises can be purchased with either a C-clamp or pedestal base. The C-clamp design allows the vise to be attached solidly to the edge of your fly tying bench (or for some intrepid traveling tyers, the steering wheel of their vehicle!). The C-clamp is the favorite of the vast majority of tyers for their permanent setups at home, as it is unarguably a more stable platform. Once the large knurled screw has been tightened, securing the vise to the table, there is no movement of the vise during the tying process. But, when you need to tie somewhere that has no table, or the table available is thicker than the C-clamp is wide, the pedestal base is the answer to the problem. The pedestal allows the tier to place the vise on top of the table … or tailgate, or cooler or picnic table, or any flat surface of the right height! Make sure the pedestal base is quite heavy and has rubber non-skid pads on the bottom, as the vise can rock side to side and scoot around on the tabletop as you tie, making for a nettlesome tying experience. Before you purchase your next vise, determining exactly where you will use it will help you decide between the C-clamp or pedestal base.

Obviously, there is also the option to have both for the same vise! Often tyers will use a C-clamp when tying flies at home at their dedicated tying bench and then remove the actual vise from the C-clamp base and have a pedestal base for tying while traveling. If this appeals to you, be aware that the stem length is shorter for a pedestal-base vise than for a C-clamp model. Fortunately, most vise manufacturers solve this dilemma by selling vise stems separately as accessories, allowing you to purchase what you need.

Tube Flies
Tube flies are a relatively new innovation in the world of fly tying. Instead of dressing a hook, the fly tyer wraps the materials directly onto a hollow plastic tube (or copper, or a variety of other options). Tube flies have seen a huge rise in popularity in recent years, especially with swing anglers who target steelhead, Atlantic salmon and sea trout all over the world. Leaders are fed through the tube and can slide loosely within it, and a piece of “junction tubing” is then slipped onto the leader – a soft rubber section of hose just larger than the diameter of the tube itself. Then a short shank bare hook is tied onto the end of the leader. Finally, you slide it all back and fit them together – the eye of the hook fits into one end of the junction tubing and the tube fly fits into the other, making it all one unit.

Tying tubes is not a difficult process at all, but you cannot just stick a tube into a standard fly tying vise. There are two ways to deal with this dilemma. The first one is extreme: If you are a hard-core tube fly tyer, there are vises dedicated to this style, so there are no jaws on the “vise” at all, just a long straight mandrel to slip the tube over. Obviously this option is not for everyone, and you probably won’t want to drop $400 on a tube fly vise to see if you like tying them.

Tube Fly Adapters

For the casual or beginner tube fly tyer, there are a few different adapters on the market that you can put into the jaws of your standard vise and turn it into a tube vise. These work great, don’t break the bank, and don’t force you to own two totally separate vises. The HMH Tube Fly Adapter is my favorite and the one I use.

Interchangeable jaws
While the standard jaws that come with a vise will be more than adequate for all the tying needs of most tyers, it’s worth noting that many vise manufacturers offer specialty jaw options. Most common are “midge” jaws, with narrow, tapered jaws perfectly suited for tying smaller patterns. Some companies also offer oversized jaws that lock large saltwater hooks solidly into place, a task that is often beyond the capability of most standard jaws.

The Stonfo Transformer Vise

These alternate jaw options are easy to interchange with each other, and for some tyers offer perfect solutions to their tying challenges.

Conclusion
Your vise is the most important tool in the fly tying game, without a doubt. Purchase the best vise you can afford, and it will serve you a lifetime. Take all of these ideas into consideration when making your next big decision on what vise to commit to for the long haul. There is no simple answer to which one is the best. They all have distinct features, and it is a very personal thing to find the vise that fits your style of tying. Hopefully this article can point you in the right direction and help you know what features to look for during the vetting process. Remember that you can always give us a shout at The Fly Shop® to answer any other questions you may have to aid in your decision. We live and breathe this stuff and are always here to help!

Top 5 things to consider before purchasing your new fly tying vise:

1) What type of flies are you most into tying?
Trout, salmon & steelhead streamers, saltwater, tube flies?

2) What size flies will you mostly be tying?
Small, medium, large or all sizes?

3) Do you want a Standard or Full Rotary vise?
Strictly personal preference

4) Will the vise be permanently mounted at your home bench, or will you travel with the vise as well?
C-clamp, pedestal or BOTH?

5) Do you prefer the spring style jaws or locking cam style jaws?
Regal or Dyna-King?

Give us a shout at (800) 669-3474 if you have questions about purchasing your next vise or any general fly tying questions.